What are Custom Diecast Cars
Custom made diecast model cars represent a fascinating intersection of artistry, craftsmanship, and the enduring appeal of miniature vehicles. These aren’t your run-of-the-mill, factory-produced toys; they are meticulously crafted, often one-of-a-kind creations that reflect the owner’s vision and passion. Building a custom diecast car involves modifying existing diecast models to achieve a desired look, replicating a specific real-world vehicle, or simply expressing creativity through design. The process can range from minor cosmetic enhancements to extensive overhauls, including complete repaints, detailed interior work, and the addition of custom parts. The allure of these cars lies not just in their visual appeal, but also in the sense of accomplishment and personalization they offer the builder. They are miniature works of art, reflecting individual interests and skills, and providing a unique way to celebrate the love of cars. The best custom diecast cars are a testament to patience, attention to detail, and a genuine appreciation for automotive design.
Benefits of Custom Diecast Cars
The benefits of delving into the world of custom diecast cars extend far beyond mere aesthetic enjoyment. The process is a rewarding hobby that fosters creativity, problem-solving skills, and a deep appreciation for detail. Building custom models provides an outlet for artistic expression, allowing individuals to explore color palettes, design elements, and unique stylistic choices. The process of researching, planning, and executing a custom build enhances critical thinking and problem-solving abilities, as builders navigate challenges such as parts sourcing, modification techniques, and achieving realistic finishes. Furthermore, the hobby encourages patience and precision, as intricate details demand careful handling and a steady hand. Beyond personal fulfillment, custom diecast cars can also serve as a source of community and connection. Enthusiasts often share their creations online, participate in model car clubs, and attend shows, fostering a sense of camaraderie and shared passion. Owning a custom-made diecast car is also a great way to create a unique collection. They stand out from mass-produced models, making them a conversation piece and a prized possession. The added value of building a custom diecast model is that it reflects personal style and interests, making it a truly special and valuable item.
Planning Your Custom Diecast Car

Before you even pick up a tool, careful planning is critical for a successful custom diecast car project. Start by defining your goals. Do you want to replicate a specific car, create an original design, or simply improve the look of an existing model? Research is key. Gather reference photos, drawings, or even blueprints of the car you’re modeling or the design you have in mind. This will help you visualize the final product and identify the necessary modifications. Sketch out your ideas, noting the colors, decals, and any custom features you plan to incorporate. Create a detailed list of the materials, tools, and parts you’ll need. This includes the base model, paints, primers, decals, detail parts (like wheels, exhaust pipes, or spoilers), and tools like hobby knives, files, and paintbrushes. Budgeting your time and resources is also important. Customizing a diecast car can be time-consuming, so set realistic deadlines. Determine how much you’re willing to spend on the project, considering the cost of materials and any tools you may need to purchase. With proper planning, you’ll have a roadmap for your project, increasing the likelihood of a satisfying and impressive result.
Choosing the Right Base Model
Selecting the right base model is fundamental to the success of your custom diecast car project. The base model serves as the foundation upon which you’ll build your custom creation, so its quality and suitability are critical. Consider the make, model, and scale of the car you want to customize. Look for models that offer a good level of detail and accuracy, as these will provide a better starting point for your modifications. Assess the existing features of the model. Does it have the details you want to preserve or modify? Does it have any features that will hinder your customization plans? Evaluate the build quality. Check for any flaws in the casting, such as imperfections or gaps. Also consider the availability of aftermarket parts. If you plan to add custom wheels, exhausts, or other components, make sure there are parts available for the base model you choose. Consider the cost of the base model. It should align with your budget and the overall investment you’re willing to make in the project. Popular brands known for quality diecast models include Autoart, Minichamps, and TSM-Model. These brands typically offer high levels of detail and accurate representations of real-world vehicles. Choosing the correct base model sets the stage for a more enjoyable and successful custom diecast car build.
Scale Considerations
Scale is an essential factor in custom diecast model cars, influencing the overall appearance, detailing possibilities, and the availability of parts and accessories. The most common scales for diecast model cars include 1:18, 1:24, and 1:43. Larger scales, such as 1:18, offer more room for detail and easier access to intricate components. This makes them popular choices for customizers who want to add a high level of realism. 1:24 scale models strike a balance between detail and size, providing a manageable format for modification while still offering a good level of visual impact. These are a great entry point for many custom diecast model makers. Smaller scales, such as 1:43, are ideal for creating larger collections or dioramas, but the smaller size can make detailed work more challenging. Choosing the right scale depends on your personal preferences, the level of detail you desire, and the space available for your collection. Remember that the scale affects the size of available aftermarket parts, so ensure that your chosen scale aligns with the parts you plan to use. Consider the desired outcome and your comfort level with intricate work when selecting the appropriate scale for your custom diecast car.
Materials for Customization

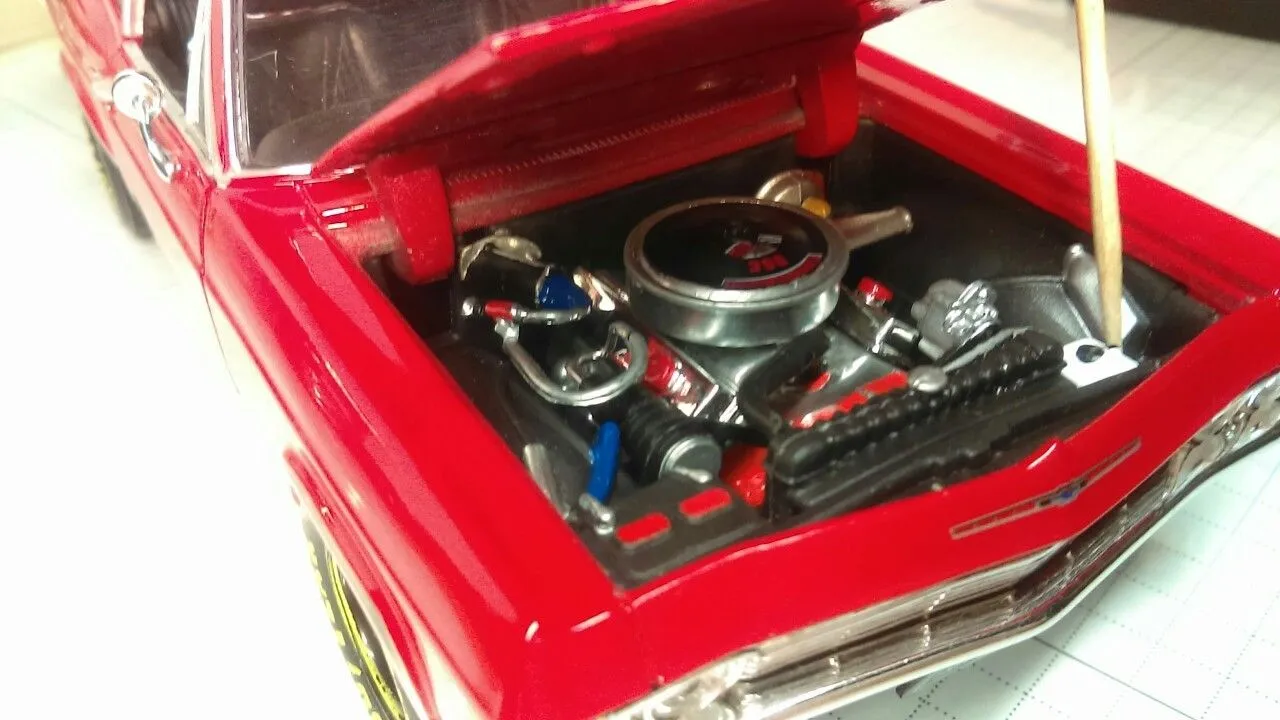
The materials you choose play a critical role in the success and longevity of your custom diecast car project. The primary materials are the base model (typically made of diecast metal), paints, primers, and various detail components. Choosing the correct paints and primers is essential for achieving a smooth, durable, and realistic finish. Acrylic paints are popular for their ease of use, fast drying times, and compatibility with various surfaces. Enamel paints offer greater durability and resistance to chipping but require more time to dry and may require more advanced techniques. Primers are crucial for preparing the surface of the model, providing adhesion for the paint, and filling in minor imperfections. Detail components are used to enhance realism and add custom features. These can include aftermarket wheels and tires, photo-etched parts, custom decals, interior upgrades (such as seats and dashboards), and engine details. Adhesives and sealants are vital for assembling and securing parts. Cyanoacrylate (super glue) is excellent for bonding small components, while epoxy adhesives provide strong, durable bonds. Always choose materials that are compatible with each other and the base model. Conduct research, read reviews, and test materials on scrap pieces before applying them to your custom diecast car. Using high-quality materials can significantly improve the look and the longevity of your work.
Paint and Finishing Techniques
Achieving a professional-looking finish is a key element in creating a stunning custom diecast car. Proper preparation is essential for a flawless paint job. Begin by thoroughly cleaning the model to remove any dirt, grease, or residue. Use a mild soap solution or a specialized degreaser. Disassemble the model as much as possible to allow for easy access to all surfaces. Sand the surface with fine-grit sandpaper to remove any imperfections and create a good surface for the primer to adhere to. Apply a primer coat to the entire model. Primer helps to ensure the paint adheres properly, fills in minor imperfections, and provides a uniform base color. Once the primer is dry, lightly sand it with fine-grit sandpaper to smooth out any imperfections. Apply the base coat of paint in thin, even layers. Multiple thin coats are better than one thick coat, as they reduce the risk of runs and drips. Allow each coat to dry completely before applying the next. Consider using an airbrush for a professional-looking finish, as it provides better control and more even coverage. After the paint has dried completely, apply a clear coat to protect the paint and give it a glossy finish. Once the clear coat is dry, you can polish the model to enhance the shine. Then, it’s time to add details and reassemble the model.
Preparing the Surface
Surface preparation is the unsung hero of a great-looking custom diecast car. Proper preparation ensures that the paint adheres correctly and that imperfections are minimized. Start by carefully disassembling the model. Remove wheels, windows, interior components, and any other parts that could interfere with the painting process. Thoroughly clean the model to remove any dirt, oil, or residue. Use a mild soap solution or a specialized degreaser. Inspect the model for any imperfections, such as scratches, dents, or molding flaws. Use hobby putty or filler to fill in any gaps or imperfections. Once the filler has dried, sand the filled areas smooth using fine-grit sandpaper. Sand the entire surface of the model with fine-grit sandpaper to create a slightly rough surface that will allow the primer to adhere. Be sure to reach into all the corners and crevices. Use progressively finer grits of sandpaper, working your way up to a very fine grit to achieve a smooth surface. Thoroughly clean the model again after sanding to remove any dust or debris. Take your time and pay attention to detail. Proper surface preparation is the foundation for a professional-looking custom diecast car.
Painting Stages

The painting stages are crucial for achieving a flawless and visually appealing finish for your custom diecast car. After prepping the surface, the first step is applying a primer coat. Primer provides a base for the paint, promotes adhesion, and helps to fill in any minor imperfections. Apply thin, even coats of primer, allowing each coat to dry completely before applying the next. Once the primer is dry, lightly sand it with fine-grit sandpaper to smooth out any imperfections. The next stage is applying the base coat. Use acrylic or enamel paints, depending on your preference and the desired finish. Apply thin, even coats, building up the color gradually. Multiple thin coats are preferable to a single thick coat to prevent runs and drips. Allow each coat to dry completely before applying the next. Consider using an airbrush for a more professional finish. Once the base coat is dry, you can apply decals and details. This may involve using waterslide decals or custom-printed decals. Carefully apply the decals, using setting solutions to help them conform to the contours of the model. After the decals are applied, you can apply a clear coat to protect the paint and the decals. Clear coats are available in gloss, semi-gloss, and matte finishes. The application of each coat of paint should follow the same practices to achieve the best result.
Applying Decals and Details
Applying decals and details is where your custom diecast car truly begins to take shape, adding realism and personality. Start by preparing the surface where the decals will be applied. Ensure that the surface is clean, smooth, and free of any dust or debris. Carefully cut out the decals from the decal sheet, trimming as close to the design as possible. Submerge the decal in lukewarm water for the recommended time, usually 10-30 seconds, until the decal slides easily off the backing paper. Gently slide the decal off the backing paper and position it on the model. Use a soft cloth or cotton swab to gently press the decal onto the surface, removing any air bubbles or excess water. Once the decals are in place, you can use decal setting solutions to help them conform to the contours of the model and to prevent silvering (air bubbles trapped under the decal). Add details such as emblems, badges, lights, and other small parts to further enhance the appearance of your custom diecast car. Use super glue or other appropriate adhesives to attach the detail parts carefully. Use paint to touch up any imperfections or to add additional details. Allow the decals and details to dry completely before applying a clear coat to protect them.
Assembly and Detailing
Assembly and detailing is the stage where your custom diecast car comes to life, turning individual components into a cohesive and finished product. Reassemble the model, carefully attaching the wheels, windows, interior components, and any other parts that were removed during the painting and modification process. Use the appropriate adhesives or fasteners to secure the parts. Pay close attention to the alignment and fit of the parts. Add details such as chrome trim, exhaust pipes, mirrors, and other small components to enhance the realism of your model. Use paint to touch up any imperfections or to add additional details. Consider weathering techniques to add a realistic look of wear and tear. Use washes, dry brushing, and other techniques to simulate dirt, rust, and other effects. Make sure the final result is an amalgamation of great skills, and patience. Clean up any excess glue, paint, or debris. Check the model for any imperfections and make any necessary adjustments or touch-ups. Once you’re satisfied with the appearance of the model, apply a clear coat to protect the paint and decals. This stage is where all your hard work comes together.
Wheels and Tires

Upgrading the wheels and tires is one of the most impactful ways to customize the look of your diecast car. Consider replacing the stock wheels and tires with aftermarket sets that offer a more realistic or customized appearance. Measure the diameter and width of the existing wheels and tires to determine the appropriate size for the replacements. Ensure that the new wheels and tires fit properly within the wheel wells and do not interfere with the suspension. Consider the style of wheels that you want to use. There are many options available, including custom rims, racing wheels, and classic designs. You can also consider using different types of tires, such as racing slicks, low-profile tires, or off-road tires. Before installing the new wheels and tires, you may need to modify the axles or the wheel wells to accommodate them. Use appropriate adhesives or fasteners to secure the new wheels and tires to the model. This will significantly enhance the visual appeal and realism of your custom diecast car. This simple modification can completely transform the look of the model.
Interior Customization
Customizing the interior of your diecast car adds a new level of detail and realism to your custom build. Begin by carefully removing the interior components, such as the seats, dashboard, and door panels, from the model. Clean the interior components and prepare them for painting or modification. Consider painting the interior components to match the exterior color scheme or to create a contrasting effect. Add details such as custom seats, steering wheels, and dashboards to enhance the realism of the interior. Use aftermarket detail sets or scratch-build custom components. Modify the interior to represent a specific car model or a custom design. This may involve adding roll cages, racing seats, or other performance-oriented upgrades. Use flocking or other materials to create a realistic look for the carpet. Reassemble the interior components, carefully attaching them to the model. This allows for an even more engaging visual experience. The options are endless, and the final effect can dramatically increase the value and appeal of the model.
Displaying Your Custom Diecast Car
After investing time and effort in building a custom diecast car, displaying your creation is a way to showcase your work and enjoy your accomplishment. Consider the setting where you will display your model. A display case or shelf provides a safe and visually appealing way to present your car. Position your model in a location that allows for optimal viewing and protects it from dust, sunlight, and accidental damage. Arrange your custom diecast car with other models to create a themed collection. Experiment with different poses and angles to highlight the details and design of your model. Use lighting to enhance the visual impact of your model. Consider using spotlights or LED lights to illuminate your custom diecast car. Display your custom diecast car in a way that complements its design and the overall aesthetic of your collection. Take high-quality photos of your custom diecast car to document your work and to share with others. Share your photos with online communities. Displaying your custom diecast car is a way to protect your creation and to share your passion.